
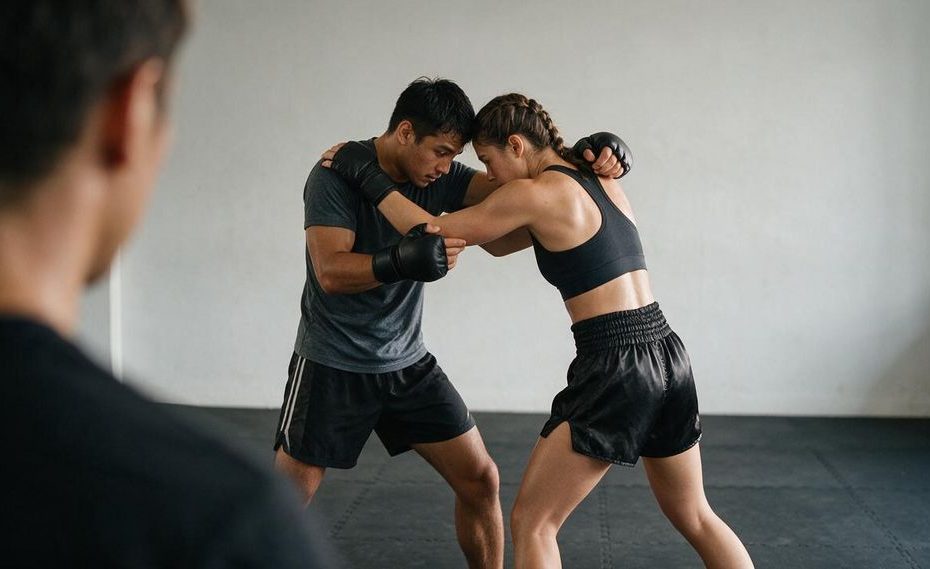
The Muay Thai clinch is a close-range position where you control an opponent’s posture, arms, and balance to create knees, angles, sweeps, or safe exits. Strong clinch work depends on upright posture, inside control, steady footwork, and relaxed pressure rather than arm strength alone.
When you’re new to clinching, everything can feel too close and too fast. You may be unsure where to place your hands, when to move your feet, or why every grip drains your energy. Breaking the skill into basic positions, common errors, and repeatable drills helps you build control without becoming overwhelmed.
What Is The Muay Thai Clinch And Why Should You Learn It?
The Muay Thai clinch is stand-up grappling performed at close range. You use your hands, forearms, shoulders, hips, and stance to manage an opponent’s posture and balance while creating room for legal attacks.
Clinching is a scoring part of Muay Thai rather than a simple pause between striking exchanges. Knees, controlled turns, sweeps, and visible posture control can show that you’re directing the exchange. An active clinch may continue as long as the fighters are working, though a referee can separate an inactive position. Exact interpretations depend on the promotion and rule set.
The clinch also gives you a way to manage forward pressure. Good hand placement can stop an opponent from freely punching or setting their feet, and good head position can prevent them from controlling your neck. You still need to protect yourself from knees, turns, and sweeps, so grabbing and waiting isn’t enough. Every grip should help you improve position, attack, defend, or exit.
Technique often gives you an advantage over someone who relies only on size. You’ll use your body weight, posture, hip position, and timing to move the other person rather than squeezing as hard as possible. This is why smaller practitioners can become effective clinchers. Strength helps, but it can’t replace balance and positioning.
What Are The Core Muay Thai Clinch Positions For Beginners?
Beginners should learn the double collar tie, single collar tie, over-under position, and basic arm control. These positions teach you how to protect your posture, gain inside control, create angles, and prevent uncontrolled knees.
Double collar tie, also called the Thai plum: Place your hands behind the opponent’s head or upper neck, keep your forearms close to the sides of the neck, and draw your elbows inward. Your chest stays close enough to limit their space, but your head remains upright. Avoid hanging your body weight through your arms or yanking straight down. Use your stance and a slight body turn to disturb their posture before adding a controlled knee.
Single collar tie: Control the head or neck with one hand and use your free arm to monitor a bicep, forearm, or shoulder. This position gives you more freedom to frame, turn, defend, or change grips than the double collar tie. Keep the elbow of your collar-tie arm close instead of allowing it to flare outward. A wide elbow gives the other person room to swim an arm inside and recover control.
Over-under position: One of your arms passes over an opponent’s arm, and the other passes underneath the opposite arm. This position often appears during entries, grip exchanges, and defensive battles. Keep your head close to the opponent’s chest or shoulder so they can’t easily turn and pull your head down. Use small steps to square your stance or move toward the side where you have better control.
Arm control: You can control a bicep, forearm, wrist, or trapped arm to limit the opponent’s ability to grip and strike. Arm control works best when it connects to a second point of control, often the head, neck, or shoulder. Grabbing an arm without controlling posture leaves room for the opponent to move around your grip. Keep your elbows close and adjust your feet as the other person turns.
A body lock can also appear when your arms wrap around the torso. In Muay Thai, it is commonly used for brief control, off-balancing, and legal dumps rather than prolonged wrestling. Keep your hips positioned safely and follow the rules taught by your coach. Wrestling-style takedowns and certain throwing actions may be prohibited under the rule set you’re using.
How Do You Build Strong Clinch Posture?
Strong clinch posture starts with your head upright, chin controlled, spine tall, elbows close, and feet underneath you. Your stance should let you resist a pull, deliver a knee, and step to an angle without crossing your legs.
Your head position affects the rest of your body. If you drop your head or allow it to drift away from your hips, the opponent can pull you forward and disrupt your base. Look ahead rather than down at the floor. Keep your head close enough to deny space without driving it carelessly into your partner.
Your hips should stay ready to move instead of being pushed far behind your shoulders. Leaning backward weakens your stance and creates room for knees through the middle. Leaning too far forward places your weight over your toes and makes turns easier for the opponent. Aim for balanced pressure through your feet, with your knees soft enough to step and recover.
Elbow position protects your inside space. When your elbows flare, the opponent can swim their hands inside, reach your neck, or slip into a body lock. Draw your elbows toward your ribs and collarbones without squeezing your shoulders toward your ears. This lets you maintain structure with less fatigue.
Your feet should make short, controlled adjustments. Large steps create moments when your base is narrow, and crossed feet leave you open to turns or sweeps. Move the foot closest to your intended direction, then bring the other foot back under you. Keep enough width in your stance to resist pressure without becoming rooted in place.
What Common Clinch Mistakes Should Beginners Fix?
The most common mistakes are pulling only with the arms, losing upright posture, flaring the elbows, crossing the feet, holding without attacking, and staying tense. Fixing these habits will improve your control and reduce how quickly you become tired.
Pulling with your arms: Beginners often attempt to fold an opponent by squeezing the neck and curling their arms. This burns the shoulders and grip without producing reliable control. Connect your hands to your upper body, settle your weight through your stance, and turn your torso as your feet adjust. The pull should come from your body position rather than a long arm curl.
Leaning back or dropping your head: Broken posture makes it difficult to defend knees, regain inside control, or move your feet. If your posture starts to collapse, address it before attacking. Frame against the opponent’s collarbone, bicep, or shoulder, then bring your hips underneath you. Raise your head and rebuild your stance before fighting for a stronger grip.
Flaring your elbows: Wide elbows give the opponent direct access to the inside position. Keep your forearms connected to their upper body and your elbows pointed down or inward. When an opponent swims an arm inside, don’t respond by squeezing harder. Release enough pressure to re-pummel your arm and recover the inside lane.
Poor footwork: Crossing your feet, standing too narrow, or taking long steps makes your balance easy to disrupt. Use short steps and keep your base underneath your shoulders. Move your feet with your grips instead of pulling first and stepping late. A turn works best when your upper body and lower body move together.
Holding without creating action: A grip has little value if you remain square and motionless. Use it to break posture, create a knee, turn the opponent, trap an arm, improve your position, or exit safely. Avoid chasing attacks before you have balance and control. Position gives the attack a stable base.
Tensing your entire body: Constant tension makes you feel strong for a few seconds and exhausted soon afterward. Keep enough pressure to preserve your position, then relax muscles that aren’t doing useful work. Breathe during grip exchanges and reset your shoulders whenever you have stable control. Clinching should feel connected and deliberate, not rigid.
Which Beginner Clinch Drills Build Useful Skills?
The best beginner clinch drills isolate posture, hand placement, footwork, knees, and grip recovery before adding stronger resistance. Start slowly enough to notice when your head, elbows, hips, or feet move out of position.
Posture and stance drill: Begin in your normal fighting stance and picture controlled pressure pulling your head forward. Keep your spine tall, settle your hips under your shoulders, and take short steps in every direction. Add small turns without crossing your feet. Reset immediately when your stance becomes too narrow or your upper body leans away from your base.
Wall knee drill: Place your hands or forearms lightly against a wall and stand close enough to practice the knee without reaching. Lift the knee through the center, engage the hip, return your foot under you, and regain your stance. Keep your head upright and avoid falling into the wall. The wall is a reference for balance, not something to push with full force.
Partner pummeling: Begin from a light over-under or single-collar-tie position. Take turns swimming an arm inside and replacing the partner’s control. Keep your elbows close and move your feet whenever your upper body changes position. The goal is clean hand fighting and posture recovery, not overpowering your partner.
Entry drill: Start at normal striking range and use a jab, guarded step, or coach-approved hand frame to close distance. Establish one secure point of contact before reaching for a second grip. Finish in balanced posture rather than rushing into the partner’s chest. Pause after every entry so your coach can check your head, elbows, hips, and feet.
Controlled neck wrestling: Work with a partner at low resistance and attempt to improve your grips or posture without strikes. One person can begin with a collar tie, and the other can practice framing, standing tall, and re-pummeling inside. Switch roles before fatigue causes careless pulling. Add light knees or turns only after you can maintain safe control.
Defense and escape drill: Give your partner a stable grip, then work through one escape at a time. Frame, restore your posture, control an arm, and move to an angle before separating. Avoid ripping your head backward against a tight grip. A clean escape rebuilds your balance before creating distance.
How Can You Practice Clinching Without A Partner?
You can practice posture, footwork, hand placement, entries, knee rhythm, and breathing without a partner. Solo work cannot replace live grip exchanges, but it can prepare your movement for coached partner drills.
Shadow clinching gives you a simple way to connect your upper body and feet. Visualize entering behind a safe guard, placing a single collar tie, stepping outside the opponent’s stance, and turning. Keep your elbows close and return to a stable stance after every movement. Move at a pace that lets you check your form rather than rushing through repetitions.
You can also practice hand-position sequences in the air. Move from an imagined frame to a single collar tie, add bicep control, swim an arm inside, and return to your guard. Keep your shoulders relaxed and avoid clenching your fists throughout the drill. The purpose is to build efficient movement between positions.
A heavy bag can support knee rhythm and posture practice when your gym permits clinch work on it. Hold the bag with controlled forearm pressure, keep your chest tall, and alternate knees without hanging from your arms. Allow the bag to move slightly, then use your feet to regain position. Don’t force the bag into neck-pulling motions that your coach hasn’t taught.
Solo conditioning should support technique rather than replace it. General work for your legs, hips, upper back, grip, trunk, and neck can help you maintain posture under pressure. Choose controlled exercises appropriate for your training level. Neck exercises should be learned from a qualified coach, especially if you have no prior experience with them.
How Do You Defend The Clinch And Avoid Getting Kneed?
You defend the clinch by protecting your posture, closing dangerous space, controlling the opponent’s arms, and regaining inside position. Don’t focus only on removing the hands from your neck, since the opponent may still control your balance and create knees.
If an opponent gains a double collar tie, bring your hips closer so they have less space to drive a long knee. Raise your posture without jerking your head backward, place a forearm or hand against a safe control point, and begin swimming an arm inside. Turn your body as you recover the inside position. Standing still and pulling against the grip usually wastes energy.
Use your arms to monitor the opponent’s biceps and forearms. This can interrupt their ability to pull your head into a knee or change to another grip. Keep your elbows near your body so you can protect the center. Once you regain control, move your feet and create an angle instead of remaining directly in front of them.
Your stance also protects you from sweeps. Keep your feet under you, avoid letting your legs cross, and don’t place all your weight on one leg for too long. If the opponent begins turning you, step in the direction of the pressure and rebuild your base. Fighting the turn with a stiff upper body can make your balance worse.
When you need to exit, create structure before separating. Control an arm, frame against the upper body, step to a safe angle, and return your hands to your guard. Pushing straight backward with extended arms can leave you open as you release. Treat the exit as part of the technique rather than the end of it.
How Should Beginners Train The Clinch Safely?
Beginners should train clinching under qualified supervision, use controlled resistance, and agree on the permitted techniques before starting. Clean positioning should come before hard knees, forceful neck pulling, fast sweeps, or competitive rounds.
Begin partner drills at a pace where you can release a grip immediately. If one person loses balance, stop rather than finishing a sweep through uncontrolled momentum. Use pads or coach-approved protective equipment when knees are added. Elbows should stay out of beginner clinch exchanges unless an instructor has created a specific controlled drill.
Communicate before every round. Decide whether the drill includes hand fighting, knees, turns, sweeps, or escapes, and match the resistance to the less experienced partner. Avoid sudden increases in speed when the other person expects technical work. Controlled resistance gives you time to recognize poor posture and unsafe hand placement.
Stay aware of the difference between normal training effort and pain. Stop if you feel sharp discomfort, dizziness, or a loss of safe movement. Don’t continue forceful neck work to prove that you can tolerate it. Ask your coach to review the grip and position before resuming.
Competition rules can differ between organizations and promotions. The International Federation of Muay Thai Associations (IFMA) recognizes clinch work and knee strikes as legal parts of Muay Thai, with restrictions on certain takedowns and throwing actions. Your gym may use narrower rules during beginner training. Confirm the permitted techniques before practicing sweeps, dumps, or body-lock attacks.
What Are The Basic Muay Thai Clinch Positions?
- Double collar tie: both hands control the neck.
- Single collar tie: one hand controls the neck, the other controls an arm.
- Over-under: one arm is over, one is under.
- Arm control: trap one or both arms to create knees.
Build Comfort Before Adding Speed
The Muay Thai clinch becomes easier when you stop treating it as a strength contest and start treating it as a battle for posture, inside space, and balance. Learn a few dependable positions, keep your elbows close, and move your feet whenever your grips change. Correct mistakes at low resistance before adding knees, turns, or sweeps. Solo drills can improve your stance and movement, but regular partner practice teaches you how grips change under real pressure. Stay relaxed, protect your posture, and let clean repetitions build the confidence that beginners often lack at close range.