
 Itai Liptz
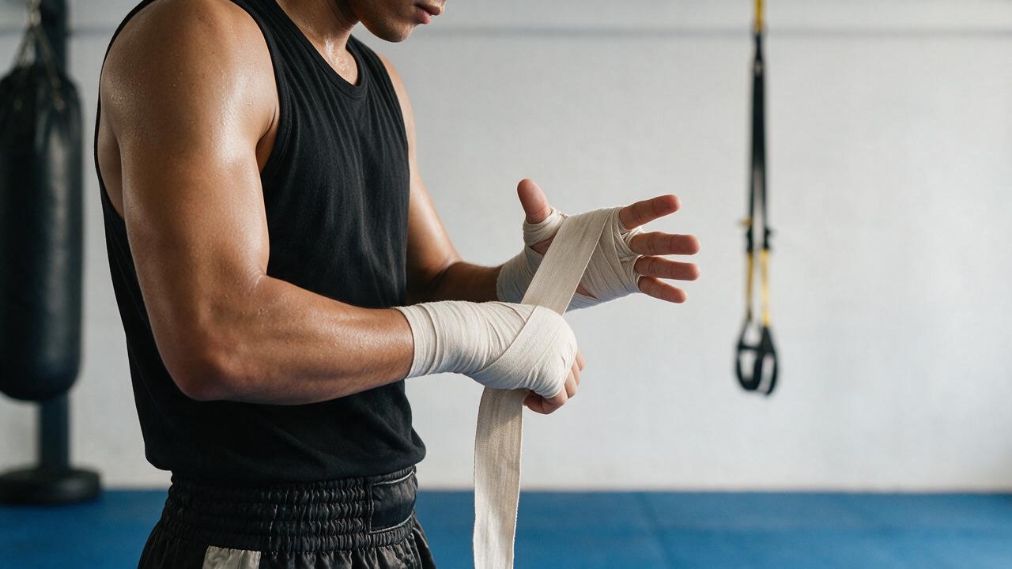
Muay Thai hand wrapping should create a firm, smooth layer across your wrists, knuckles, hands, and thumbs without restricting circulation. Your fingers should stay warm and mobile, the material should remain flat, and the finished wrap should fit comfortably inside your glove.
This guide gives you a repeatable wrapping method that works with common 120-inch and 180-inch training wraps. You’ll also learn how to choose a wrap length, control tension, prevent slipping, adapt the wrap for different training sessions, and correct common mistakes.
Why Muay Thai Hand Wrapping Matters
Hand wraps help support your wrists, cover your knuckles, and reduce movement inside your gloves. They also keep your hand structure more stable when you close your fist. A smooth wrap distributes material across the hand instead of leaving one thick pad or several pressure points.
Wraps don’t replace well-fitting Muay Thai gloves or sound punching technique. They add another layer of support beneath the glove. If you still experience wrist or hand pain after changing your wrapping technique, stop training through the discomfort and speak with your coach or a qualified medical professional.
Consistency matters more than creating a complicated wrap. Use the same route each time, maintain even tension, and check your hands before putting on your gloves. With regular practice, you’ll learn where you need more wrist support or knuckle coverage without creating excess bulk.
What You Need Before You Start
Use a clean pair of reusable boxing or Muay Thai hand wraps with a thumb loop and hook-and-loop closure. Cotton wraps provide a traditional feel with limited stretch. Elasticated cotton wraps, often called Mexican-style wraps, conform more closely to your hands but can become restrictive if you pull too hard.
Unroll the wrap and identify the side that needs to face outward at the closing end. This prevents you from reaching the wrist with the hook-and-loop closure facing the wrong direction. Roll the wrap again from the closure toward the thumb loop so it feeds cleanly from your hand.
Remove rings, watches, bracelets, and anything else that could press into your skin. Start with dry hands and spread your fingers naturally. Keep the hand relaxed during most of the process, then close your fist when checking the finished fit.
- A matched pair of clean hand wraps
- Dry hands with all jewelry removed
- Enough time to restart if the wrap bunches
- Your gloves for a final fit check
Choosing 120-Inch Or 180-Inch Hand Wraps
Common training wraps are sold in 120-inch lengths, about 3 meters, and 180-inch lengths, about 4.5 meters. Boxing hand wraps can be used for Muay Thai when they fit your hands, remain flat, and provide enough material for your preferred method. The sport printed on the packaging matters less than the wrap’s length, material, condition, and fit.
A 120-inch wrap can work for smaller hands, short training sessions, or a simple method with fewer passes between the fingers. You’ll need to distribute the material carefully. Spending too much wrap on the wrist may leave too little for the knuckles and thumb.
A 180-inch wrap gives you more material for knuckle coverage, finger passes, thumb support, and a firm wrist finish. It’s usually the easier option when you’re learning because you have more room to adjust the route. The extra length can create bulky folds, so keep every layer flat and avoid repeatedly covering one small area.
How To Wrap Your Hands For Muay Thai Step By Step
This method starts at the thumb, anchors the wrist, crosses the back of the hand, covers the knuckles, supports the thumb, and finishes at the wrist. Use light, steady tension as the wrap moves around your hand. Pulling harder doesn’t create a better wrap.
The same route works on your left and right hands. Reverse the direction naturally so the material travels from the thumb side across the back of each hand. If the second hand feels awkward, slow down and match the position of each layer rather than forcing the same arm movement.
Step 1: Place The Thumb Loop
Slide the loop over your thumb with the printed instruction or marked side facing the correct direction. Let the rolled wrap rest across the back of your hand rather than crossing your palm immediately. The loop should sit near the base of your thumb without digging into the skin.
Step 2: Anchor The Wrist
Guide the wrap down to your wrist and circle it two or three times. Keep these layers flat, slightly overlapping, and centered around the joint. The wrist should feel supported when you bend it gently, but you should still be able to move it without pinching.
Three passes are a practical starting point with 180-inch wraps. Two passes may be enough when you’re using 120-inch wraps or have smaller hands. If you need stronger wrist support, add a pass only when enough material remains for the knuckles and thumb.
Step 3: Cross The Back Of The Hand
Bring the wrap diagonally from the wrist across the back of your hand toward the outer edge of your knuckles. Keep your palm open and your fingers spread slightly. Crossing the back of the hand connects the wrist anchor to the knuckle layers and helps limit shifting.
Avoid pulling the material tightly across the center of your palm. Too much fabric there can bunch when you make a fist. Keep the diagonal pass smooth, then guide the wrap around the base of your fingers.
Step 4: Cover The Knuckles
Wrap across the knuckles two or three times with your fingers relaxed and slightly separated. Position the fabric below the main finger joints so it doesn’t slide over your fingertips. Overlap each pass enough to create an even pad rather than a narrow cord of material.
Close your fist gently after the first few passes. The wrap should settle around the knuckles without pulling your fingers together. If you feel pressure across the base of your fingers, unwind the last pass and reduce the tension.
Step 5: Wrap Between The Fingers
With a 180-inch wrap, bring the fabric diagonally across the back of the hand and pass it between the little and ring fingers. Return across the back of the hand and around the wrist. Repeat between the ring and middle fingers, then between the middle and index fingers.
These finger passes can help hold the knuckle layers in place during bag work and pad rounds. Keep the fabric near the base of each finger and use light tension. If the wrap pinches when you close your fist, loosen the finger passes or leave them out when using shorter wraps.
Step 6: Support The Thumb
Bring the wrap from the wrist across the back of the hand and circle the thumb once. Guide the material around the base rather than over the thumb joint. Return diagonally to the wrist so the thumb support connects to the existing anchor.
Move your thumb in several directions before continuing. It should feel supported without being pulled tightly toward your palm. If the thumb loop or wrap edge digs into your skin, adjust its position rather than covering the pressure point with more material.
Step 7: Secure The Knuckles And Wrist
Use the remaining material to make another diagonal pass across the back of the hand. Add knuckle coverage if the padding feels thin, then bring the wrap back to your wrist. Finish with flat wrist passes and secure the hook-and-loop closure.
The closure should finish around the wrist rather than across your knuckles or palm. If it lands in the wrong place, remove one wrist pass or adjust the amount used earlier. Don’t twist the wrap into a rope just to reach the closure.
How To Get Muay Thai Hand Wrapping Tension Right
Your wraps should feel firm when your hand is open and secure when you make a fist. They shouldn’t cause tingling, numbness, throbbing, unusual coldness, or a change in finger color. Any of those signs mean you need to remove the wrap and apply it again with less tension.
Elasticated wraps require extra care because a small stretch on every pass can build into strong compression. Lay the material against your skin and use only enough pull to remove slack. Cotton wraps stretch less, but they can still restrict movement when several tight layers overlap.
Complete a circulation check before putting on your gloves. Open and close your hand several times, spread your fingers, move your thumb, and bend your wrist gently. Press a fingernail until it becomes pale, then release it and confirm that its normal color returns promptly.
Common Hand-Wrapping Mistakes And Fixes
Numb fingers usually point to excessive tension, tight finger passes, or too many compressed layers around the hand. Remove the wrap rather than waiting for it to loosen during training. Rewrap with lighter tension and keep your fingers spread during the knuckle stage.
Slipping knuckle layers often come from wrapping a closed fist, skipping the back-of-hand anchors, or leaving the material too loose. Keep your hand open as you build the pad, then add finger passes or diagonal anchors. Test the wrap by making several fists before putting on your gloves.
Bulky palms can make it harder to close your hand inside the glove. Route most of the material across the back of the hand, knuckles, thumb, and wrist. Smooth every fold immediately because a small wrinkle can become an uncomfortable pressure point under the glove.
- Closure facing inward: Unroll the wrap and reroll it from the closure end before starting.
- Thumb loop digging in: Reposition the loop or remove it after the first wrist anchor if your method allows.
- Wrist still feels loose: Use a longer wrap or save more material for the finish.
- Wrap comes undone: Confirm that the closure is clean, aligned, and secured around the wrist.
- Glove feels too tight: Reduce overlapping layers instead of forcing your wrapped hand inside.
Adapting Your Wrap For Bag Work, Pads, And Sparring
For bag work, prioritize stable knuckle coverage and a secure wrist because repeated punches can make loose layers shift. Finger passes can help hold the knuckle pad in place. Check the wrap again after the first round and stop if your wrist bends uncomfortably on impact.
For pad work, use the same base method unless your coach recommends a change. A familiar wrap makes it easier to notice whether discomfort comes from the wrapping job, glove fit, or punching alignment. Don’t compensate for poor wrist position by applying an excessively tight wrap.
For sparring, make sure the wrapped hand fits comfortably inside the gloves required by your gym. Competition wrapping may involve gauze, tape, and event-specific requirements rather than reusable cloth wraps. Ask your coach, gym, or event promoter about the applicable rules before preparing competition wraps.
How To Wash And Care For Hand Wraps
Wash reusable wraps regularly according to their care label. Place the hook-and-loop closure against its matching surface before washing so it doesn’t catch other fabric. A mesh laundry bag can help prevent long wraps from tangling around other items.
Let the wraps dry fully before rolling or storing them. Damp wraps can retain odors and make your gym bag smell after only a few sessions. Keep more than one pair in rotation so you don’t need to train with wraps that are still wet.
Replace wraps when the material becomes thin, permanently stretched, badly twisted, or difficult to secure. A worn closure that opens during training is another sign that the pair has reached the end of its useful life. Inspect the thumb loops and seams regularly for fraying.
Muay Thai Hand-Wrapping Questions
Should Hand Wraps Go Over Or Under Gloves?
Hand wraps go directly around your hands and wrists, under your gloves. Put your gloves on only after checking circulation, finger movement, wrist support, and closure placement.
Can You Use Boxing Hand Wraps For Muay Thai?
Yes. Standard reusable boxing wraps can work for Muay Thai when they provide enough length, stay flat, and fit comfortably under your gloves. Many products are marketed for several striking sports.
Do You Have To Wrap Between The Fingers?
No single training method fits every hand. Finger passes can stop knuckle layers from shifting, especially with longer wraps, but they can be omitted when using shorter wraps or when they cause pressure.
How Do You Wrap Without A Thumb Loop?
Place the starting end against the wrist and hold it in position during the first two passes. Once the wrist anchor secures the end, continue across the back of the hand. Check that the loose end remains flat beneath the layers.
How Do You Wrap The Opposite Hand?
Follow the same route in reverse. Move from the wrist across the back of the hand toward the outer knuckles, then return toward the thumb side. Focus on matching coverage and tension rather than copying the exact arm motion.
How Long Does It Take To Learn?
Your first few attempts may require several restarts. Practice outside class when you aren’t rushed, using the same sequence every time. Speed develops once you stop needing to decide where the wrap goes.
How Do You Wrap Your Hands For Muay Thai?
- Place the thumb loop and wrap the wrist two or three times.
- Cross the back of the hand and cover the knuckles.
- Support the fingers and thumb with firm, even tension.
- Finish at the wrist, secure the closure, and check circulation.
Build A Wrap You Can Repeat Before Every Session
A reliable Muay Thai hand wrap feels smooth, secure, and comfortable from warm-up through your last round. Start with an appropriate wrap length, keep the material flat, and use even tension rather than pulling as hard as possible. Give the knuckles, thumb, and wrist enough support without filling the palm with excess fabric. Check your circulation and glove fit before training, then restart whenever you feel numbness, pinching, or unusual pressure. Once you can repeat the same Muay Thai hand wrapping sequence on each hand, getting ready for class becomes faster and far less frustrating.